Got quite a bit done over the last few days. Getting closer and closer to painting time (excitement builds).
As you can see the engine bay is in need of some serious love.
 |
| From Z |
But first I need to drop the front suspension.
I started by unbolting the front sway bar end links.
 |
| From Z |
Remove the sway bar mounting brackets and bushings.
 |
| From Z |
I unbolted the T/C rods and the control arms from the frame and subframe respectively.
 |
| From Z |
Repeat on passenger side.
 |
| From Z |
At this point I just unbolted the steering rack from the subframe. Four bolts hold it on and it is very self explanitory. Then I just lifted the rack and pinion off of the subframe. I didn't get any pics cause I didn't really know what I was doing lol.
Then I simply supported the rotors with a jack so they don't just drop out, and unbolted the strut towers.
 |
| From Z |
Easy peasy.
Same thing with the subframe.
 |
| From Z |
Bolts right out with no fuss.
Now were ready to start cleaning and stripping!
 |
| From Z |
Time for a little of my magic wire wheel/PickleX combo.
 |
| From Z |
I was extremely pleased with the luck I had with the engine bay rust.
All of it was merely surface rust. It all brushed right out and was easily treatable with PickleX 20.
Check it.
 |
| From Z |
I will be going into actual paint prep mode soon. But this was just to get the shitty paint and rust out and treated.
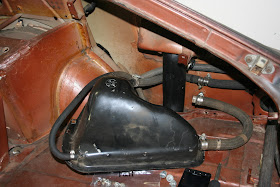
Moving on, I finally got around to pulling the vapor tank and all that sucky OEM vent hosing.
 |
| From Z |
 |
| From Z |
Also pulled the headliner and the rest of the interior vinyl and rearview mirror.
 |
| From Z |
 |
| From Z |
I definitely recommend having someone help you if you need to remove your hatch. It's not too heavy to lift, but holding it up with your head while unscrewing the hinges is stupid. And THEN you have to raise the hatch all the way up, and twist the hinges out of their sockets with no hands.
I'm glad I don't have any pics of me doing this.
 |
| From Z |
I finally figured out how easy it is to remove the chrome trim from around the windows too.
 |
| From Z |
Dirty.
 |
| From Z |
Almost starting to look like shes getting ready for paint prep.
 |
| From Z |

Damn! Nice Job!
ReplyDeleteGood work, there! The chassis looks very tidy, you're lucky there's no rust. Mine has lots of welding left.. Are you keeping the battery tray?
ReplyDeleteThanks for the kind words guys!
ReplyDeleteYes I know, I have been counting my blessings all along with this build and the rust situation.
I was actually considering removing the tray and relocation the battery to the trunk but I think I am going to leave it for now. I can always do it later if I choose.
It was in surprisingly good shape after cleaning up the surface rust.
Ill post a better pic tomorrow of how clean the tray area is looking.
If I may offer advise on the battery tray.. cut it out, freshen up the inner fender area and pop in some rivnuts, and bolt the tray back in. That way you can access the area behind it easily later. Z's are known to rust there, and you might get unlucky later with a leaky battery or something. Just my $0.02 though. Aaanyway, looking forward to more progress! :)
ReplyDelete