

 |
| From Z2 |
Showing posts with label Engine. Show all posts
Showing posts with label Engine. Show all posts
Sunday, July 10, 2011
Monday, May 16, 2011
Engine rebuild - pt.3
With the short block assembled, it was time for head installation.
I used the Felpro 1mm head gasket so I could get my target 9.2:1 compression ratio.
Note: Maxima N47 Head, and a stock N42 L28 short block and rotating assembly, with a 1mm Felpro head gasket makes for a 9.2:1 comp ratio.
I cleaned up the gasket surfaces on the head and the block by using an extra fine silicon carbide wet/dry sand paper and air tool oil as a lubricant. This helps make sure that there aren't any traces of old gasket left on the surface. I recommend that you do this if you do not have the surfaces professionally machined.
I also wire brushed out the combustion chambers using WD40 to help break up the carbon deposits. Worked great! At this time, make sure you line up the cam thrust plate timing dowel with the top center timing mark (it will be obvious when you look at it).
With the block dowels and head gasket down, I carelessly tossed the head onto the block, making sure to align everything perfectly.
Be absolutely sure that the first piston is at exactly top center.
After searching for almost an hour, I finally found my head bolts and thumb tightened them into their holes.
Then, according to the factory specified torque procedure, I tightened it all down.
Then we installed the crank side timing sprocket. Make sure when you install this, that the timing mark is visible, or you will have to take it back off and flip it over (me).
Then the chain tensioner, guides, and cam sprocket get installed. Make sure that you install the #1 cam hole on the cam thrust plate dowel. Then make sure that the "bright links" on the timing chain install on both of the #1 sprocket teeth.
Like this.
Head and timing system installed.
Next up is the timing cover, oil pump, water pump, distributer, all the gaskets and seals, and then the oil pan and valve cover!
 |
| From Z2 |
I used the Felpro 1mm head gasket so I could get my target 9.2:1 compression ratio.
Note: Maxima N47 Head, and a stock N42 L28 short block and rotating assembly, with a 1mm Felpro head gasket makes for a 9.2:1 comp ratio.
I cleaned up the gasket surfaces on the head and the block by using an extra fine silicon carbide wet/dry sand paper and air tool oil as a lubricant. This helps make sure that there aren't any traces of old gasket left on the surface. I recommend that you do this if you do not have the surfaces professionally machined.
 |
| From Z2 |
I also wire brushed out the combustion chambers using WD40 to help break up the carbon deposits. Worked great! At this time, make sure you line up the cam thrust plate timing dowel with the top center timing mark (it will be obvious when you look at it).
|
| From Z2 |
With the block dowels and head gasket down, I carelessly tossed the head onto the block, making sure to align everything perfectly.
Be absolutely sure that the first piston is at exactly top center.
 |
| From Z2 |
After searching for almost an hour, I finally found my head bolts and thumb tightened them into their holes.
 |
| From Z2 |
Then, according to the factory specified torque procedure, I tightened it all down.
 |
| From Z2 |
Then we installed the crank side timing sprocket. Make sure when you install this, that the timing mark is visible, or you will have to take it back off and flip it over (me).
 |
| From Z2 |
Then the chain tensioner, guides, and cam sprocket get installed. Make sure that you install the #1 cam hole on the cam thrust plate dowel. Then make sure that the "bright links" on the timing chain install on both of the #1 sprocket teeth.
Like this.
 |
| From Z2 |
 |
| From Z2 |
Head and timing system installed.
 |
| From Z2 |
Next up is the timing cover, oil pump, water pump, distributer, all the gaskets and seals, and then the oil pan and valve cover!

Wednesday, May 11, 2011
Engine rebuild - pt.2
Now that the block has been prepped, it's time to start the actual build process.
To help me with this, I had to call up my nerdiest friend, Chris.
We started by pulling off all of the old piston rings. Be careful when doing this as all the heat from the motor will have made them brittle and prone to breakage when bent.
Once all of the rings were off I inspected the ring lands to make sure that they were reusable and they all checked out fine.
Next we installed the new piston rings.
Make sure that you install the rings with the gaps facing the correct direction as advised by whatever rebuild reference you are using. The point here is so that none of the gaps are in the same place.
Next we moved on to the crankshaft main bearings.
We cleaned the block several times with Brakleen to make sure that it was nice and free of debris.
Then we installed the bearings making sure that they all ended up in their proper locations.
So fresh and so clean.
Next we lubed up the rear of the crankshaft and installed the rear main seal onto the crank. Nissan says that this is incorrect, but they are chuckleheads and this way is best.
Then, we lubed up all of the bearing journals with 20/50 motor oil and laid the crankshaft into the bearings, being extra careful not to ding the rear main seal or the journals on the crankshaft on the way in.
The first cap to install is the rear main cap. This slides into the void shown below very snuggly. We ran 1" of SuperBlack RTV on each corner of the block to ensure a tight seal.
Once the cap is installed, we slid the rubber seals, and shim nails into the RTV filled cap voids.
Then we installed the rest of the caps, starting with the front and working our way back to the rear main. After they were all installed, we followed the proper torque order and torqued them all to the recommended 40ft/lbs.
Now that the crankshaft is installed, it is time to install the pistons.
We installed the connecting rod bearings into the rods, and removed the end caps.
Then, using a piston ring compressor, we cranked the rings down to prep them for installing into the block.
We inserted the piston into the block rod first until the piston ring compressor stopped on the gasket surface of the block. Then, using a shop towel and the wooden end of a hammer, we banged the piston into place being careful not to lose the connecting rod bearings from below, or ding the crankshaft journals. It is also a good idea to spin the crank until the piston that you are installing would be at top of its stroke. That way the connecting rod can seat correctly on the crank journal.
Once the piston was in, we turned the block on it's side to thumb tighten the rod nuts.
Repeat these steps for all six pistons.
Flip the block and torque all of the connecting rod bolts to spec and you're done.
Rotating assembly assembled.
To help me with this, I had to call up my nerdiest friend, Chris.
 |
| From Z2 |
We started by pulling off all of the old piston rings. Be careful when doing this as all the heat from the motor will have made them brittle and prone to breakage when bent.
 |
| From Z2 |
Once all of the rings were off I inspected the ring lands to make sure that they were reusable and they all checked out fine.
 |
| From Z2 |
Next we installed the new piston rings.
 |
| From Z2 |
Make sure that you install the rings with the gaps facing the correct direction as advised by whatever rebuild reference you are using. The point here is so that none of the gaps are in the same place.
 |
| From Z2 |
Next we moved on to the crankshaft main bearings.
 |
| From Z2 |
We cleaned the block several times with Brakleen to make sure that it was nice and free of debris.
 |
| From Z2 |
Then we installed the bearings making sure that they all ended up in their proper locations.
 |
| From Z2 |
So fresh and so clean.
 |
| From Z2 |
Next we lubed up the rear of the crankshaft and installed the rear main seal onto the crank. Nissan says that this is incorrect, but they are chuckleheads and this way is best.
 |
| From Z2 |
Then, we lubed up all of the bearing journals with 20/50 motor oil and laid the crankshaft into the bearings, being extra careful not to ding the rear main seal or the journals on the crankshaft on the way in.
 |
| From Z2 |
The first cap to install is the rear main cap. This slides into the void shown below very snuggly. We ran 1" of SuperBlack RTV on each corner of the block to ensure a tight seal.
 |
| From Z2 |
Once the cap is installed, we slid the rubber seals, and shim nails into the RTV filled cap voids.
 |
| From Z2 |
Then we installed the rest of the caps, starting with the front and working our way back to the rear main. After they were all installed, we followed the proper torque order and torqued them all to the recommended 40ft/lbs.
 |
| From Z2 |
Now that the crankshaft is installed, it is time to install the pistons.
We installed the connecting rod bearings into the rods, and removed the end caps.
Then, using a piston ring compressor, we cranked the rings down to prep them for installing into the block.
 |
| From Z2 |
We inserted the piston into the block rod first until the piston ring compressor stopped on the gasket surface of the block. Then, using a shop towel and the wooden end of a hammer, we banged the piston into place being careful not to lose the connecting rod bearings from below, or ding the crankshaft journals. It is also a good idea to spin the crank until the piston that you are installing would be at top of its stroke. That way the connecting rod can seat correctly on the crank journal.
 |
| From Z2 |
Once the piston was in, we turned the block on it's side to thumb tighten the rod nuts.
 |
| From Z2 |
Repeat these steps for all six pistons.
 |
| From Z2 |
Flip the block and torque all of the connecting rod bolts to spec and you're done.
 |
| From Z2 |
Rotating assembly assembled.
Monday, May 9, 2011
Engine rebuild - pt.1
So I started rebuilding my L28 this weekend and can honestly say that without this book, I would be straight up guessing at what to do.
If you want to rebuild an L series motor, you can do no better.
Luckily, I had the foresight to bag and mark all of my nuts and bolts from the disassembly so it was very easy to take inventory before getting started.
I pulled my L28 block out of storage and gave it a good cleaning before doing anything. Brakleen loves me.
My first order of business was to hone my cylinder bores.
I strongly recommend watching a video on how to do this to get an idea of the speed of plunging and spinning that is required.
As for honing oil, everyone has a different opinion. Some say kerosene is the best, some say to use a mix of 20w motor oil and kero, some say to never use motor oil, etc etc..
I found one site that said that they had the best results from using WD40. So I picked that one cause it was easy. :)
Attach the spring loaded cylinder hone to your favorite drill and get to work, making sure that you clean the bores thoroughly, and keep them well oiled. I had bad results from honing while the block was upside down. I recommend that you hone with the block right side up.
If all goes well, and you are a master of doing things, your hone job will be perfectly crosshatched. A quick google will show you that machine shops can get a much nicer cross hatch than this, but since I completed this job for about $20 (including the WD40), I am happy with it.
Next you have to clean the bores three times with WD40 and Brakleen and check the bores thoroughly for any deep scratches or anything at all that you can catch your fingernail on. If you can catch your finger nail on it, it's no good and you have to re-hone it.
Sweet.
Next up is test fitting and gapping your piston rings. I bought mine from Rock auto and got the cheapest ones I could find. The "Economy ring" by Sealed Power.
They ship the rings in separate compartments because each ring is different, and needs to be an exact length for each ring's specific job and heat tolerance requirements.
Keeping tabs on which rings will be where in relation to the piston and their specific cylinder bores, you have to test fit them in the block.
The top or primary compression rings need to have a total ring gap of .014 inches (0.36mm). With the use of the proper feeler gauge, I was able to determine that my "Econo" rings and my Craigslist L28 were exactly perfect with all rings on all bores.
I continued this process with the bottom or secondary compression rings. They required a total ring gap of .012 inches since they are subject to less heat and subsequent expansion, they require less overall clearance tip to tip.
Every single ring in every single bore measured out absolutely perfectly (lucky mofo), so I did not have to shave any of my rings.
 |
| From Z2 |
If you want to rebuild an L series motor, you can do no better.
Luckily, I had the foresight to bag and mark all of my nuts and bolts from the disassembly so it was very easy to take inventory before getting started.
 |
| From Z2 |
I pulled my L28 block out of storage and gave it a good cleaning before doing anything. Brakleen loves me.
 |
| From Z2 |
My first order of business was to hone my cylinder bores.
I strongly recommend watching a video on how to do this to get an idea of the speed of plunging and spinning that is required.
 |
| From Z2 |
As for honing oil, everyone has a different opinion. Some say kerosene is the best, some say to use a mix of 20w motor oil and kero, some say to never use motor oil, etc etc..
I found one site that said that they had the best results from using WD40. So I picked that one cause it was easy. :)
 |
| From Z2 |
Attach the spring loaded cylinder hone to your favorite drill and get to work, making sure that you clean the bores thoroughly, and keep them well oiled. I had bad results from honing while the block was upside down. I recommend that you hone with the block right side up.
 |
| From Z2 |
If all goes well, and you are a master of doing things, your hone job will be perfectly crosshatched. A quick google will show you that machine shops can get a much nicer cross hatch than this, but since I completed this job for about $20 (including the WD40), I am happy with it.
 |
| From Z2 |
Next you have to clean the bores three times with WD40 and Brakleen and check the bores thoroughly for any deep scratches or anything at all that you can catch your fingernail on. If you can catch your finger nail on it, it's no good and you have to re-hone it.
 |
| From Z2 |
Sweet.
Next up is test fitting and gapping your piston rings. I bought mine from Rock auto and got the cheapest ones I could find. The "Economy ring" by Sealed Power.
 |
| From Z2 |
They ship the rings in separate compartments because each ring is different, and needs to be an exact length for each ring's specific job and heat tolerance requirements.
 |
| From Z2 |
Keeping tabs on which rings will be where in relation to the piston and their specific cylinder bores, you have to test fit them in the block.
 |
| From Z2 |
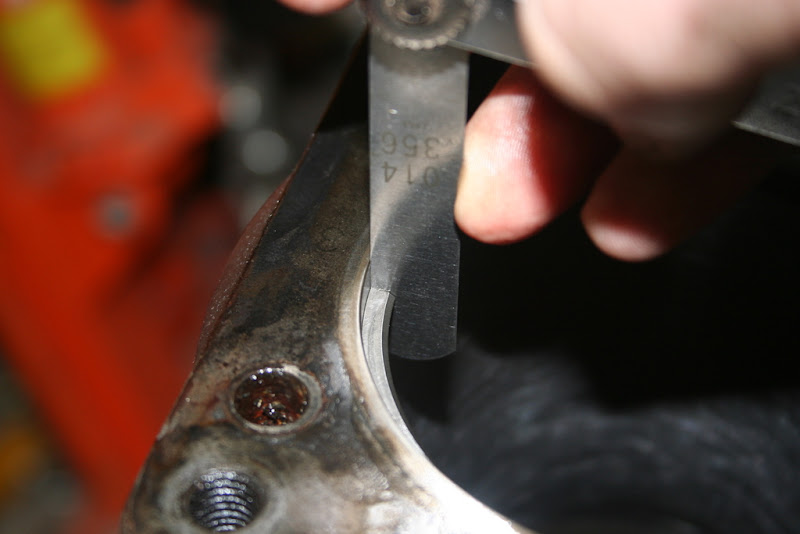
The top or primary compression rings need to have a total ring gap of .014 inches (0.36mm). With the use of the proper feeler gauge, I was able to determine that my "Econo" rings and my Craigslist L28 were exactly perfect with all rings on all bores.
 |
| From Z2 |
I continued this process with the bottom or secondary compression rings. They required a total ring gap of .012 inches since they are subject to less heat and subsequent expansion, they require less overall clearance tip to tip.
Every single ring in every single bore measured out absolutely perfectly (lucky mofo), so I did not have to shave any of my rings.
Friday, May 6, 2011
Engine Parts
Starting to get all of my rebuild parts in.
Motor mounts, thermostat, connecting rod bearings, crankshaft main bearings...
Full engine gasket set.
The Rock Auto gasket set pretty much comes with everything. I was very surprised with how complete it was. I even got valve stem seals, and those little plastic strips that slide into the crankshaft end cap on the block.
Lots of work to do this weekend. Hopefully I will have time to get started on the rebuild.
Motor mounts, thermostat, connecting rod bearings, crankshaft main bearings...
 |
| From Z2 |
 |
| From Z2 |
Full engine gasket set.
 |
| From Z2 |
The Rock Auto gasket set pretty much comes with everything. I was very surprised with how complete it was. I even got valve stem seals, and those little plastic strips that slide into the crankshaft end cap on the block.
Lots of work to do this weekend. Hopefully I will have time to get started on the rebuild.
Monday, December 13, 2010
GOT IT!
I tried PB blaster, a torch, a drill, a screw extractor, a hammer, a tow truck, and a pair of mutant Siamese goats to get this f*cking screw out of this block. What ended up working was a tool that looks like I stole it from the '50s.
Wiki:"An impact driver is a tool that delivers a strong, sudden rotational and downward force. In conjunction with toughened screwdriver bits and socket sets, they are often used by mechanics to loosen larger screws (bolts) and nuts that are corrosively "frozen" or over-torqued"
As it turns out, I have needed an impact driver for a long time and just didn't know it existed.
Since I stripped the hell out of the philips head portion of the screw, I had to dremel out a slot just big enough for my slotted bit.
I covered the block with paper towels to minimize metallic bits betting where they are not welcome.
Cut the slot in the screw on the right. the one on the left still had plenty of meat left for screwing (lol).
You just stick this thing on the screw, turn it to one side and hammer the piss out of it!
FINALLY!!!!
Be careful taking the plate out as you want to be sure you don't cut yourself.
If you do though, just wrap it in a shop towel.
Put your gloves on, and get back to work!
Good as new.
Big thanks to everyone for the suggestions. I demand that all of you add this too to your toolboxes immediately.
I got this one at Sears (Craftsman) for $20. It was marked $30 but they have it on sale for 31% off right now so go quick!
Wiki:"An impact driver is a tool that delivers a strong, sudden rotational and downward force. In conjunction with toughened screwdriver bits and socket sets, they are often used by mechanics to loosen larger screws (bolts) and nuts that are corrosively "frozen" or over-torqued"
As it turns out, I have needed an impact driver for a long time and just didn't know it existed.
 |
| From Z |
Since I stripped the hell out of the philips head portion of the screw, I had to dremel out a slot just big enough for my slotted bit.
 |
| From Z |
I covered the block with paper towels to minimize metallic bits betting where they are not welcome.
 |
| From Z |
Cut the slot in the screw on the right. the one on the left still had plenty of meat left for screwing (lol).
 |
| From Z |
You just stick this thing on the screw, turn it to one side and hammer the piss out of it!
 |
| From Z |
 |
| From Z |
FINALLY!!!!
 |
| From Z |
Be careful taking the plate out as you want to be sure you don't cut yourself.
 |
| From Z |
 |
| From Z |
If you do though, just wrap it in a shop towel.
 |
| From Z |
Put your gloves on, and get back to work!
Good as new.
 |
| From Z |
Big thanks to everyone for the suggestions. I demand that all of you add this too to your toolboxes immediately.
I got this one at Sears (Craftsman) for $20. It was marked $30 but they have it on sale for 31% off right now so go quick!
Subscribe to:
Posts (Atom)


 Posts
Posts


