Quoted from MotoIQ.com:
What the Hell? HKS to Close US Operations!
MotoIQ Staff Report
We were shocked and dismayed to see this notice come across our desks yesterday afternoon. HKS the iconic Japanese manufacturer of some of the best engineered tuner parts on the market is ceasing US operations. HKS will start winding down operations and be done here sometime this summer, around August.
This news came as a total shock. Many HKS employees have been our colleagues and close friends for years, even decades and of course we are concerned about their well being. MotoIQ is also a fan of and a strong supporter of companies like HKS that represent our true industry, the quality performance and innovation of the industry.
Many factors are involved with this decision. HKS states the reasons in the official memo shown below as the slow economy in Japan and the US, a global lack of demand for performance parts, an unfavorable exchange rate between the yen and dollar and the devastating earthquake in Japan.
At MotoIQ we feel that perhaps the most important reason has been left out. Probably HKS doesn't want to point fingers and complain, it's not Japanese style to do that so we will do it for them. HKS has been perhaps one of the biggest victims of Chinese companies ripping off their designs and selling reproduced cheap junk copies of their parts, some of it even boldly labeled as genuine HKS products.
The staff of MotoIQ is calling on our readers to take a stand. Don't support the makers of rip off parts. Beware of what you are buying, especially what you might buy on line on Ebay and the like. Don't patronize the rip off companies and the fake JDM companies. HKS is not the only casualty. ARC, Apexi, JUN, RSR and Tanabe are all either defunct or greatly diminished in US presence because of the rip off artists. Many good US companies have been put out of business by them as well.
Of all the leading Japanese tuning companies, only Greddy, ARK, RAYS, Tomei and Toda will be currently openly active and supportive of the US market. If you continue to patronize companies that rip off, soon you will have no parts other than janky copies of crap for your cars and no parts will be developed for newer cars. It's hard for us to publicly name names of the rip off artists, last time we attempted to do this, we were threatened by a lawsuit.
A prime example of a market that was eliminated by the Chinese was that of the Sentra SE-R. At one time it had a thriving aftermarket but the Chinese and Ebayers moved in and drove all the innovating companies either out of business or into other markets. Few quality parts are now available for the platform and the SE-R scene died. Few new parts have been developed for new Sentras and the only enthusiasts left are mostly people who build janky cars. All interest and innovation has moved on. The Chinese copycatter killed this platform dead in around three years.
Now it's happening on a larger scale. To stop this plague don't buy fakes. Save your money and buy real parts. First of all, support MotoIQ's advertisers and partners. MotoIQ has a no fakes policy. We will not work with producers of fakes nor accept advertising dollars from them. We have been approached by these charlatans many times and although it would have lined our pockets we turned them down. Legal action prevents us from naming crappy companies but nothing will prevent us from writing about good ones.
Support companies like Rays, HKS, Greddy, Tomei, Toda, OS Giken, Kaaz, Tein and American companies like AMS, Full Race, Cobb, Turbonetics, Precision Turbo, and others that although perhaps they don't advertise with us, you can bet we support them and they are fans of our site. Keep it real, buy real.
HKS is not going out of business, their Japanese division will handle the US market but you can bet service will be slower, parts won't be developed for the US market and the whole company may fail shortly.
Although it is probably too late, lets start a grassroots effort to save HKS USA. Lets support them with our wallets. We will try to incorporate HKS products in our project cars and pay for them. If HKS wants it, we will give them free advertising until this crisis is passed. Please don't comment about capitalism and competitiveness below. That's not what this rant is about. Although we don't moderate our comments much we will delete these kinds of posts. This is about our love for our cars and the love of building them correctly. This is about passion for our industry. This is about action. Let's do something before it's too late.
End Quote...
Link to the Article:
Sad times....
Friday, April 29, 2011
Tuesday, April 26, 2011
Budget Garage Paint Job
So all of this preparation, disassembly, chemical stripping, cleaning, sanding drinking, humping, and dumping has all built up to this moment.
This is where the tear down becomes a build up.
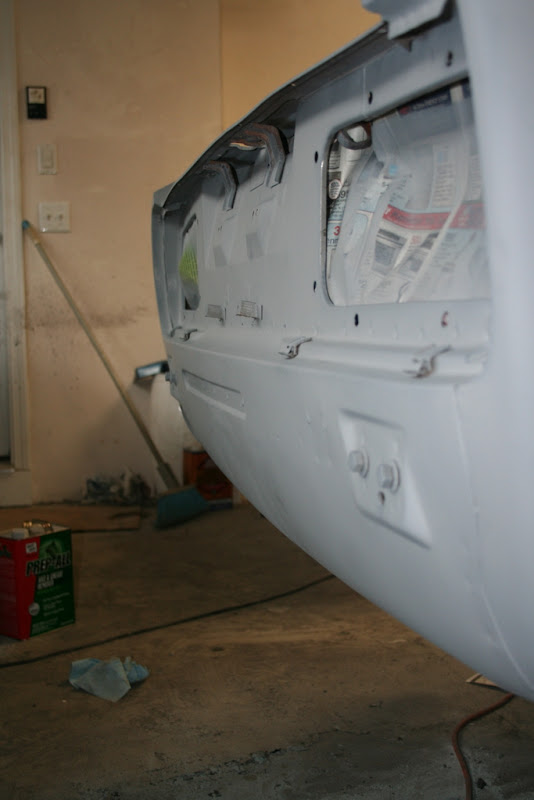
It's time to paint her.
First things first, you have to setup your garage to paint.
You need to cover up your precious clutter.
Minimize wall damage.
And have some sort of ventilation so you don't kill your cat (or girlfriend) with fumes.
Then you need to clean all of your surfaces with a grease/wax remover.
This ensures that there is no blood sweat and tears still on your car from the tear down.
Then you need to pick a primer.
I chose Transtar's 2k kwik prime. this is a direct to metal, high build sandable primer. It is pretty much everything I could ask for. But not terribly cheap at about $100 for three quarts with the needed activators and reducers.
You need a good old spray gun.
I buy mine from Harbor freight because they are decent and disposably priced. I bought two of them for this paint job. One for the primer and one for the base and clear. See below for why I was glad I did.
This stuff is thick and sticks to everything.
And don't even think about spraying anything ever without a respirator. If you do not use one of these you will die.
Once everything is setup and you are properly equipped, mix your paint to the instructions on the back and spray it!
You will learn how to spray as you go. It's easy when you are spraying primer because if you f*ck it up you can just sand it off.
Once that dries completely you have to sand the entire car with a 400 grit sand paper. I chose to Wet sand the whole car because it works great, the paper clogs less, and there is no dust which is your mortal enemy when you are painting in your garage.
Then spray a second coat.
This time I wet sanded the whole car with a 600 grit paper since I was going to be spraying my base coat right over it.
After the car is completely dry, inspect it. look at everything. Every little detail, because i know you are going to miss something.
I made a list of all the little parts that needed just s touch up and tagged them all with the primer.
Once cured, sanded and cleaned. It's time for Base coat.
I used PPG Deltron 2000 DBC in a Nissan Paint code KV3. Nissan Called it "Grey Lustre", PPG calls it "Charcoal Metallic". The after market reproduction of this color is considerably darker than the OEM color which is part of the reason I liked it so much. It is truly exactly what I was looking for.
Makes me half wish I chose a satin finish. heh But in my opinion, satin colors look great on show cars and race cars. In the real world they just end up looking like lousy paint jobs. Unless of course you keep your car "show car" clean.
Now it's time for Clear.
I bought this clear because it was cheap and they recommended it at the shop. Either this clear is not the best, I suck at spraying clear coats, or both. I am not sure whether or not to recommend this based on my experience with it.
I am sure that this orange peel is due to my spray technique and my gun settings.
But the clear coat really makes that color look good.
That is the most accurate representation of how the color looks in person. Almost black from an angle, and dark ass grey metallic when you get up close.
I couldn't be happier with the color, but the clear needs some love.
I will be wet sanding and buffing tonight.
Wish me luck.
This is where the tear down becomes a build up.
It's time to paint her.
From Z2 |
First things first, you have to setup your garage to paint.
From Z2 |
You need to cover up your precious clutter.
From Z2 |
From Z2 |
Minimize wall damage.
From Z2 |
And have some sort of ventilation so you don't kill your cat (or girlfriend) with fumes.
From Z2 |
Then you need to clean all of your surfaces with a grease/wax remover.
From Z2 |
This ensures that there is no blood sweat and tears still on your car from the tear down.
Then you need to pick a primer.
From Z2 |
I chose Transtar's 2k kwik prime. this is a direct to metal, high build sandable primer. It is pretty much everything I could ask for. But not terribly cheap at about $100 for three quarts with the needed activators and reducers.
You need a good old spray gun.
From Z2 |
I buy mine from Harbor freight because they are decent and disposably priced. I bought two of them for this paint job. One for the primer and one for the base and clear. See below for why I was glad I did.
From Z2 |
This stuff is thick and sticks to everything.
And don't even think about spraying anything ever without a respirator. If you do not use one of these you will die.
From Z2 |
Once everything is setup and you are properly equipped, mix your paint to the instructions on the back and spray it!
From Z2 |
From Z2 |
From Z2 |
You will learn how to spray as you go. It's easy when you are spraying primer because if you f*ck it up you can just sand it off.
Once that dries completely you have to sand the entire car with a 400 grit sand paper. I chose to Wet sand the whole car because it works great, the paper clogs less, and there is no dust which is your mortal enemy when you are painting in your garage.
Then spray a second coat.
From Z2 |
From Z2 |
From Z2 |
From Z2 |
This time I wet sanded the whole car with a 600 grit paper since I was going to be spraying my base coat right over it.
From Z2 |
After the car is completely dry, inspect it. look at everything. Every little detail, because i know you are going to miss something.
I made a list of all the little parts that needed just s touch up and tagged them all with the primer.
Once cured, sanded and cleaned. It's time for Base coat.
From Z2 |
I used PPG Deltron 2000 DBC in a Nissan Paint code KV3. Nissan Called it "Grey Lustre", PPG calls it "Charcoal Metallic". The after market reproduction of this color is considerably darker than the OEM color which is part of the reason I liked it so much. It is truly exactly what I was looking for.
From Z2 |
From Z2 |
From Z2 |
From Z2 |
From Z2 |
Makes me half wish I chose a satin finish. heh But in my opinion, satin colors look great on show cars and race cars. In the real world they just end up looking like lousy paint jobs. Unless of course you keep your car "show car" clean.
Now it's time for Clear.
From Z2 |
I bought this clear because it was cheap and they recommended it at the shop. Either this clear is not the best, I suck at spraying clear coats, or both. I am not sure whether or not to recommend this based on my experience with it.
From Z2 |
From Z2 |
From Z2 |
I am sure that this orange peel is due to my spray technique and my gun settings.
From Z2 |
From Z2 |
But the clear coat really makes that color look good.
From Z2 |
That is the most accurate representation of how the color looks in person. Almost black from an angle, and dark ass grey metallic when you get up close.
From Z2 |
I couldn't be happier with the color, but the clear needs some love.
From Z2 |
I will be wet sanding and buffing tonight.
Wish me luck.
Sunday, April 24, 2011
How To: 240z Ground Control Coilovers w/ Sectioned Struts
This weekend I was finally able to finish my suspension build.
A few weeks ago my buddy Bruce came over and we measured everything and read all of the instructions for the build.
We used a combination of the instructions that shipped with the Ground Control kit and the write up by John Coffey from Beta Motorsports available HERE. Read the whole article, but the last part is what was most helpful since it is specific to the Tokico Ilumina BZ3099 and BZ3015 Inserts.
Everything I read gave different measurements, but the basic information was the same. Cut the strut tubes in half and remove a section from the top equal to the difference in length between the stock struts and the struts you are installing.
This is easy enough but I had to find my own measurements and cut and section the tubes strategically so everything fits and works. The most important measurement of this whole thing, is the overall height of the tube as measured from the inside (Internal Height).
Here are the measurements for sectioning 1973 Datsun 240z strut tubes to work with BZ3099 (AW11 MR2 Rear), and BZ3015 (240z Front) strut cartridges. But please remember, before cutting or welding anything, measure everything like nine times.
Front:
First, remove the stock spring perch with an angle grinder.
You will have to grind off the welded perch ring so that the strut tube is smooth.
The first cut you make is to cut the strut tube in half 6.5" up from the top of the spindle casting.
Cutting at 6.5" gives you enough room to install the new spring perch later whithout interfering with the stock brake line bracket.
Now the overall internal height of this tube needs to be 13.5". My stock internal height was 15" so in order to achieve this measurement I had to cut 1.5" from the bottom of the top strut tube section, making the top piece 7" long when all is said and done.
When you are using a big baller pipe cutter like mine it creates a lip on the inside of the tube where it cuts. This lip needs to be ground out or you will not be able to slide your strut cartridges in.
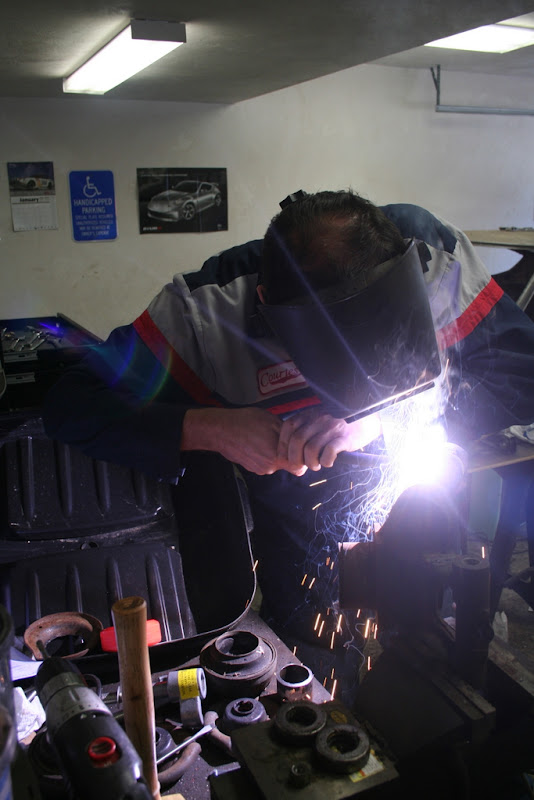
Once you get them cleaned up it's time to weld them back on.
Luckily my stock strut cartridges were blown so I didn't have to worry about heating them up too much. I was able to use them as guides for welding the tubes perfectly straight.
Then weld them up!
Once Bruce was done working his metal magic, I had to grind down the weld a bit so I could slide the new perches over them.
This is the sectioned and welded strut tube with the new perch location measured and marked with the perch around it ready to weld in. I welded the new perch so that the bottom of it was 5.5" from the top of the spindle casting. Also, make sure that the flat side of the new perch is facing the spindle side.
Tack it up and weld it in.
Once it's welded all the way around you're done!
Test fit.
Since the first one went pretty much perfectly (except for the whole stuck cartridge housing fiasco), we just repeated these steps for the other front strut tube.
Rear:
The rear strut tubes were a little easier to do because if you cut it right, you can cut the original perch weld right out of the tube without grinding it all the way down.
You do however have to cut it off.
Once the stock perch is gone, you need to cut the strut tube in half at 8.5", as measured upward from the top of the hub casting.
Grind out the lip.
The stock rear strut tubes measure 16.75" tall as measured from the inside. Since I am running front struts in the rear I need to cut them so that when welded up, they will measure 15" from the inside. This meant I had to cut 1.75" from the bottom of the top section of the strut tube.
Once cut, I test fitted the new strut and it fits perfect. Just enough room for the threaded cap.
Again I used the blown rear strut to help align the strut tube for welding. Never do this with a strut tube that is not blown.
Grind down the weld so the perch can slide over it.
Then have your buddy weld up the perch. The rear perch should be welded so that the bottom of the perch is 7" from the top of the hub casting. This places the previous weld under the threaded tube and out of sight.
Once that perch is welded all the way around you're done!
Test fit.
Just do the same thing with the second rear strut tube and you're dancing.
Please take this as a reference on how it worked for me. If you are going to be installing these parts, make sure you take all of your own measurements and confirm whether or not these will work for you.
The worst thing you can do is cut these strut tubes too short. The overall internal height needs to be very precise and cutting them too short is not easily fixable.
Hope this helps some of you guys that are thinking about building this setup.
If anyone notices any technical errors or if something is unclear, please post up so I can fix it.
Thanks to Beta Motorsports for the writeup! That proved to be very helpful and special thanks to my buddy Bruce who is the mack daddy boss man welder master of the universe.
Peace.
From Z2 |
A few weeks ago my buddy Bruce came over and we measured everything and read all of the instructions for the build.
From Z2 |
We used a combination of the instructions that shipped with the Ground Control kit and the write up by John Coffey from Beta Motorsports available HERE. Read the whole article, but the last part is what was most helpful since it is specific to the Tokico Ilumina BZ3099 and BZ3015 Inserts.
Everything I read gave different measurements, but the basic information was the same. Cut the strut tubes in half and remove a section from the top equal to the difference in length between the stock struts and the struts you are installing.
This is easy enough but I had to find my own measurements and cut and section the tubes strategically so everything fits and works. The most important measurement of this whole thing, is the overall height of the tube as measured from the inside (Internal Height).
Here are the measurements for sectioning 1973 Datsun 240z strut tubes to work with BZ3099 (AW11 MR2 Rear), and BZ3015 (240z Front) strut cartridges. But please remember, before cutting or welding anything, measure everything like nine times.
Front:
First, remove the stock spring perch with an angle grinder.
From Z2 |
From Z2 |
You will have to grind off the welded perch ring so that the strut tube is smooth.
From Z2 |
The first cut you make is to cut the strut tube in half 6.5" up from the top of the spindle casting.
From Z2 |
From Z2 |
Cutting at 6.5" gives you enough room to install the new spring perch later whithout interfering with the stock brake line bracket.
From Z2 |
Now the overall internal height of this tube needs to be 13.5". My stock internal height was 15" so in order to achieve this measurement I had to cut 1.5" from the bottom of the top strut tube section, making the top piece 7" long when all is said and done.
From Z2 |
From Z2 |
When you are using a big baller pipe cutter like mine it creates a lip on the inside of the tube where it cuts. This lip needs to be ground out or you will not be able to slide your strut cartridges in.
From Z2 |
Once you get them cleaned up it's time to weld them back on.
Luckily my stock strut cartridges were blown so I didn't have to worry about heating them up too much. I was able to use them as guides for welding the tubes perfectly straight.
From Z2 |
Then weld them up!
From Z2 |
Once Bruce was done working his metal magic, I had to grind down the weld a bit so I could slide the new perches over them.
From Z2 |
This is the sectioned and welded strut tube with the new perch location measured and marked with the perch around it ready to weld in. I welded the new perch so that the bottom of it was 5.5" from the top of the spindle casting. Also, make sure that the flat side of the new perch is facing the spindle side.
From Z2 |
Tack it up and weld it in.
From Z2 |
From Z2 |
From Z2 |
Once it's welded all the way around you're done!
Test fit.
From Z2 |
Since the first one went pretty much perfectly (except for the whole stuck cartridge housing fiasco), we just repeated these steps for the other front strut tube.
Rear:
The rear strut tubes were a little easier to do because if you cut it right, you can cut the original perch weld right out of the tube without grinding it all the way down.
You do however have to cut it off.
From Z2 |
Once the stock perch is gone, you need to cut the strut tube in half at 8.5", as measured upward from the top of the hub casting.
From Z2 |
From Z2 |
Grind out the lip.
From Z2 |
The stock rear strut tubes measure 16.75" tall as measured from the inside. Since I am running front struts in the rear I need to cut them so that when welded up, they will measure 15" from the inside. This meant I had to cut 1.75" from the bottom of the top section of the strut tube.
From Z2 |
Once cut, I test fitted the new strut and it fits perfect. Just enough room for the threaded cap.
From Z2 |
Again I used the blown rear strut to help align the strut tube for welding. Never do this with a strut tube that is not blown.
From Z2 |
Grind down the weld so the perch can slide over it.
From Z2 |
Then have your buddy weld up the perch. The rear perch should be welded so that the bottom of the perch is 7" from the top of the hub casting. This places the previous weld under the threaded tube and out of sight.
From Z2 |
From Z2 |
Once that perch is welded all the way around you're done!
Test fit.
From Z2 |
Just do the same thing with the second rear strut tube and you're dancing.
From Z2 |
Please take this as a reference on how it worked for me. If you are going to be installing these parts, make sure you take all of your own measurements and confirm whether or not these will work for you.
The worst thing you can do is cut these strut tubes too short. The overall internal height needs to be very precise and cutting them too short is not easily fixable.
Hope this helps some of you guys that are thinking about building this setup.
If anyone notices any technical errors or if something is unclear, please post up so I can fix it.
Thanks to Beta Motorsports for the writeup! That proved to be very helpful and special thanks to my buddy Bruce who is the mack daddy boss man welder master of the universe.
From Z2 |
Peace.
Subscribe to:
Posts (Atom)