Thursday, February 24, 2011

Undercoating

I've been super busy lately with work so I haven't made much progress on the build.

I did however manage to spend 5+ hours this past Monday (Presidents Day) stripping under coating and I'm still only half done.

Super shitty cell phone pic of destruction!

From Z2


I have been softening it up by slathering it with chemical stripper and letting it sit.

It comes off fairly easy after ward but will make a complete mess of you.

I do not recommend doing it this way but I am extremely "winter lazy" and simply cannot bring myself to do any really hard work. I have however been wearing the proper protective gear so I don't acid burn my eyeballs.

Wednesday, February 16, 2011

So many options...

From DirtyS30


Tons of actual paint chips in here.
Lots of colors to research... Damn this is tough.

Tuesday, February 15, 2011

Color testing

I've been spending a lot of time lately considering my options for color.

Since it is relatively difficult to know what you like until you see it, I started spray bombing my car.

From Z2


This color is Rustoleum's high Performance Graphite Metallic wheel paint.

I used this same paint on the centers of my ZX wheels and I liked how it covered and looked.

From Z2


From Z2


From Z2


A touch too light for what I was looking for.

Looking to see if I can find anyone local that owns a Gen 5 Maxima in KV3 "Grey Lustre".

The shitty pics I have been able to find online look very promising.

Thursday, February 10, 2011

Casablanca

From Z2


From Z2


SSR Casablanca 8

From Z2


From Z2


From Z2


From Z2


15x7.5 front, 15x8 rear.
Offset unknown.

From Z2


From Z2


From Z2


Tough Guy approves.

From Z2

Tuesday, February 8, 2011

LCAs

Now that my Lower Control Arms have been removed, it's time to clean them up and paint them.

From Z2


Blasted off the end bolts with an impact wrench.

From Z2


Removed the crappy rubber bushings. (to be replaced with Poly later)

From Z2


Wire brushed the crap out of them and picklex20'd.

From Z2


One of the guys in my local Z car club hit me with a tip about this paint.

From Z2


It is supposedly really durable and can be applied to almost anything.

Few coats down on both sides.

From Z2


I really dig the finish. Looks badass, and dries hard like a plastic almost.

From Z2


Sweet.

Monday, February 7, 2011

How To: 240z Spindle Pin Removal

I was finally able to remove my 240z rear suspension spindle pins.
Piece of cake if you have the right tools.

Here is how I did it for those of you that are unsure:

10 Steps to Victory!!!

1. Buy the Spindle pin Removal Tool from John (jtburf) at HybridZ.org. $50 shipped as of 2/1/2011.

From Z2


2. Apply the included Anti-seize copper lubricant to the threads of the rear facing end of the spindle pin.

Note: The rear facing side of the Lower Control arms are flat so you can only use the tool from this side.

From Z2


3. As you can see below, the all thread rod is threaded both inside and out.

From Z2


thread the rod onto the spindle pin.

From Z2


4. Lubricate the outer threads of the rod and slide the included pipe with pipe fitting over it. Make sure the included fitting is touching the LCA.

From Z2


5. Install the included washer and nut onto the rod as shown.

From Z2


6. Heat "the crap" out of the cast iron part that houses the spindle pin.

Note: This will cause the entire assembly to expand slightly loosening its grip on the spindle pin.

From Z2


7. Start slowly tightening the nut with the box end of a 28mm wrench. (I successfully used a 1-1/8" wrench since I couldn't find a metric wrench that size)

From Z2


8. It is extremely important to make sure the spindle pin is pulling through the assembly as you are tightening (see below). It has been reported that if you over-tighten the nut without breaking the pin free, you can strip the all thread from the inside out and you will be SOL.

From Z2


9. Once you are sure the pin is coming out, just keep cranking and cranking, being careful not to bend or strip anything.

From Z2


10. Victory!

From Z2


Once the spindle pin is out you may now get very excited and start telling your girlfriend all about how awesome you are. When it becomes clear that she simply does not appreciate just how awesome you are, proceed to step 11.

From Z2


11. Beer.

From DirtyS30


Time to start building a suspension system.

From Z2

Friday, February 4, 2011

Spindle Pin Tool

Thanks to John (jtburf) from hybridz.org for making this nasty looking reverse spindle press contraption.

Looks ultra bad ass.

From Z2


From Z2


If you want to pick one up they are $50 shipped and the thread is HERE.
Also, a good percentage of the sales go right back into the HybridZ community through donations.

The thread says loaner program but I just bought mine.

Check it.

YAY!

10,000 hits!

I am so honored that there are so many of you from all over the world with nothing better to do! :)

Thanks dudes and dudettes!

And now.........


a photoshop hint.


From Z2

Thursday, February 3, 2011

Pipe wrench style

Thanks for the suggestions on how to get that 51mm nut off.

From Z2


I found this wrench in the car when I first cleaned it out after buying it.


Add a little heat.

From Z2


Wrench fit like a champ.

From Z2


WAY better than buying a $60 51mm wrench.

From Z2


The strut looks clean and seems to be working pretty well.

From Z2


Still gonna throw it in the bushes.

BIG thanks to you guys who have been down this road hitting me with the tip.

Tuesday, February 1, 2011

Damn you Spindle pin!!!!

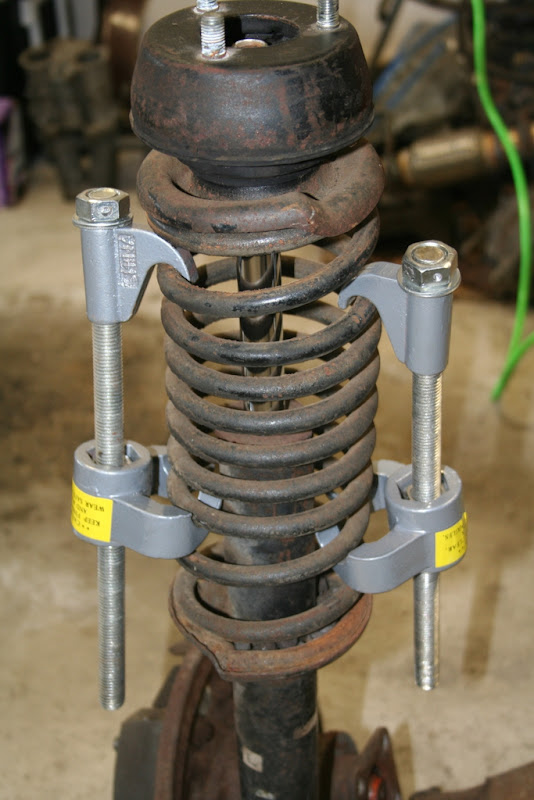
So this weekend I got started taking my rear suspension apart and of course I had to start with the springs.

Picked these up at Harbor Freight for under $10.

From Z2


Worked like a champ.

From Z2


With the spring pressure relieved I can unbolt the top hat.

From Z2


This purple substance appears to have once been some sort of bushing or bump stop.

Totally FUBARed.

From Z2


shortly after removing the spring assembly I realized that I don't have a wrench that is anywhere NEAR big enough for this.

I measured it out to 51mm!!!! WTF? Did all of you guys really go out and buy a $60 wrench for these bastards?

From Z2


Finally we meet....

From Z2


Pulled the little stopper thingy.

From Z2


And then stepped into ultra-fabrication mode.

From Z2


Check it.

From Z2


Coupler nut.

From Z2


LOL. Ridiculous spindle pin puller contraption!

From Z2


Handle.

From Z2


"This is totally gonna work!"

From Z2


HUUUUUUUUUUUUUUUURRRRRRRRRRRRRRRRRRRRRRRRR!!!!!!!!!!!!!!!!!!

From Z2


haha ok ok maybe it wont.

So then I start thinking with my tools.

From Z2


The issue here was that I couldn't get it to stay straight.

From Z2


It kept pulling from an angle.


FOILED!

Looks like I'm getting the spindle pin puller tool from HybridZ.

Oh well.... :(