

So I drank a bunch of margaritas last night and wire wheeled the insides of my fenders.
I have no pics lol.
Wednesday, March 30, 2011
Tuesday, March 29, 2011
Gutted and Sealed
So I finally got around to gutting the rest of the under dash and kick panel wires and crap.
Relays and kick panels.
Pedal box and that dreadful firewall insulation.
Feeling motivated, I fired up the compressor and got to spray sealing.
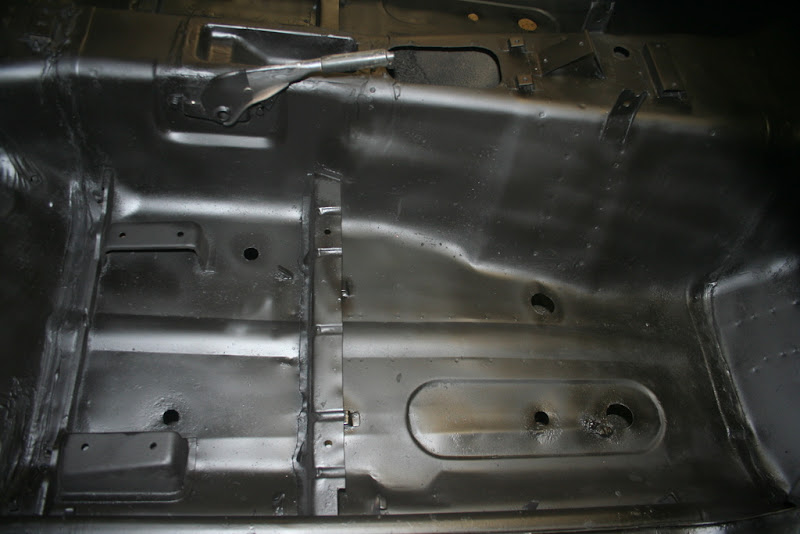
Driver side floor, all welded up with two coats of Zero Rust.
Passenger side floor welded up with two coats of Zero Rust.
So the interior floors are done for now. All I really have left to do in there is sound deadening and carpets. I am considering doing a double layer sound deadener because I really want the interior of the car to feel less like a tin can than it did last summer.
Body panels next.
 |
| From Z2 |
Relays and kick panels.
 |
| From Z2 |
Pedal box and that dreadful firewall insulation.
 |
| From Z2 |
Feeling motivated, I fired up the compressor and got to spray sealing.
 |
| From Z2 |
Driver side floor, all welded up with two coats of Zero Rust.
 |
| From Z2 |
Passenger side floor welded up with two coats of Zero Rust.
 |
| From Z2 |
 |
| From Z2 |
 |
| From Z2 |
So the interior floors are done for now. All I really have left to do in there is sound deadening and carpets. I am considering doing a double layer sound deadener because I really want the interior of the car to feel less like a tin can than it did last summer.
Body panels next.
Monday, March 28, 2011
Energy Suspension, Painting, and Floors
Finally finished gathering all of the Energy Suspension bushings for the 240z chassis.
This is the entire HyperFlex kit aside from the end link bushings since I am not going to be running a stock set of sway bars, I am going to wait until I get my hands on them to acquire the bushings.
Big thanks to Pete for helping me get all of these together!

Whipped out the tried and true, Hammered Finish spray paint from Rustoleum. Dark Bronze (Gunmetal) again.
Spraying all of my front suspension components. Two coats all around.
Looking mighty sharp.
These steering knuckles have never been happier.
Front LCAs etc.
ALSO...
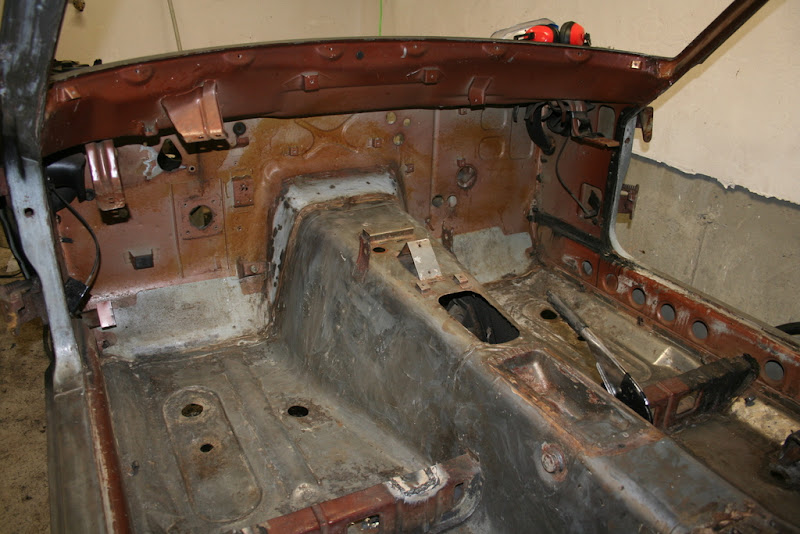
Not that you could tell from this pic, but I have just finished stripping all the under coating off of the floors and I was able to finish welding up all of the little pinholes I found. 4 total.
The driver side is all ground down and ready for cleaning and painting. Just need a little grind session on the passenger side and the inside will be ready to seal.
Not before I strip the paint and undercoating residue off the floors tonight.
 |
| From Z2 |
This is the entire HyperFlex kit aside from the end link bushings since I am not going to be running a stock set of sway bars, I am going to wait until I get my hands on them to acquire the bushings.
Big thanks to Pete for helping me get all of these together!
Whipped out the tried and true, Hammered Finish spray paint from Rustoleum. Dark Bronze (Gunmetal) again.
 |
| From Z2 |
Spraying all of my front suspension components. Two coats all around.
 |
| From Z2 |
Looking mighty sharp.
 |
| From Z2 |
These steering knuckles have never been happier.
 |
| From Z2 |
Front LCAs etc.
 |
| From Z2 |
ALSO...
Not that you could tell from this pic, but I have just finished stripping all the under coating off of the floors and I was able to finish welding up all of the little pinholes I found. 4 total.
 |
| From Z2 |
 |
| From Z2 |
 |
| From Z2 |
 |
| From Z2 |
The driver side is all ground down and ready for cleaning and painting. Just need a little grind session on the passenger side and the inside will be ready to seal.
Not before I strip the paint and undercoating residue off the floors tonight.
Friday, March 25, 2011
Blasting, Parts, and Race Gas
I had a very successful blast session at my buddy Pete's house last night.
I blasted my front lower control arms, my steering knuckles, TC rods, and pretty much everything else I could find from underneath the car.
They just need a quick washing and they will be ready for paint. I'm going to be using the Rustoleum hammered paint again on all of these parts for the durability, looks, and ease of application. It is definitely a sweet spot for my application.
One thing I didn't realize until last night was that the front LCA bushings on this car had been upgraded to adjustable metal bushings with a urethane sleeve.
They are still in good shape too. Just need a touch of cleaning up.
Also picked up this awesome box of Energy Suspension goodies!
AND THIS!
lol @ crappy pic.
A custom built aluminum Fuel Cell! This cell was run in the Bad Dog Racing 240z Race car! It still has the foam and some race gas in it. ha ha
Best of all it fits in the spare tire well, you just have to cut a hole in the well for the fuel valve at the bottom of the tank.
Still not sure whether or not I'm going to run this tank in this version of the build but we'll see how it goes.
 |
| From Z2 |
I blasted my front lower control arms, my steering knuckles, TC rods, and pretty much everything else I could find from underneath the car.
They just need a quick washing and they will be ready for paint. I'm going to be using the Rustoleum hammered paint again on all of these parts for the durability, looks, and ease of application. It is definitely a sweet spot for my application.
One thing I didn't realize until last night was that the front LCA bushings on this car had been upgraded to adjustable metal bushings with a urethane sleeve.
 |
| From Z |
They are still in good shape too. Just need a touch of cleaning up.
Also picked up this awesome box of Energy Suspension goodies!
 |
| From Z2 |
AND THIS!
 |
| From Z2 |
lol @ crappy pic.
 |
| From Z2 |
A custom built aluminum Fuel Cell! This cell was run in the Bad Dog Racing 240z Race car! It still has the foam and some race gas in it. ha ha
Best of all it fits in the spare tire well, you just have to cut a hole in the well for the fuel valve at the bottom of the tank.
 |
| From Z2 |
Still not sure whether or not I'm going to run this tank in this version of the build but we'll see how it goes.
Thursday, March 24, 2011
Illumina
Got my struts in the mail today.
MAN I love getting new parts!
2x BZ3099
and 2x BZ3015.
I'm also heading over to a friends house today to drop off some parts and sand blast some stuff. (My ball joints were a bitch to get apart from my steering knuckles)
I have a small pile of suspension and mounting parts to blast and repaint.
He has a blast cabinet which is ideal for this sort of thing. I would blast them right out in the open but it would make a ridiculous mess.
I will post after blast pics tomorrow.
MAN I love getting new parts!
 |
| From Z2 |
 |
| From Z2 |
2x BZ3099
 |
| From Z2 |
and 2x BZ3015.
 |
| From Z2 |
I'm also heading over to a friends house today to drop off some parts and sand blast some stuff. (My ball joints were a bitch to get apart from my steering knuckles)
 |
| From Z2 |
I have a small pile of suspension and mounting parts to blast and repaint.
 |
| From Z2 |
He has a blast cabinet which is ideal for this sort of thing. I would blast them right out in the open but it would make a ridiculous mess.
I will post after blast pics tomorrow.
Tuesday, March 22, 2011
Craigslist Score!
Hit Craigslist on Saturday morning while eating my breakfast and I almost choked.
Scored these two Datsun Used Car Dealership and Service center signs!
Their appears to be a date on the Parts and Service sign of (8-70).
the story the kid had was that his father scored these signs from a dealership when it closed down or something similar. The best part is that these were found local from a local Used Datsun Dealership.
If anyone can help me figure out which one I would be extremely stoked.
Definitely perfect pieces to add to my garage.
 |
| From Z2 |
Scored these two Datsun Used Car Dealership and Service center signs!
 |
| From Z2 |
Their appears to be a date on the Parts and Service sign of (8-70).
the story the kid had was that his father scored these signs from a dealership when it closed down or something similar. The best part is that these were found local from a local Used Datsun Dealership.
If anyone can help me figure out which one I would be extremely stoked.
 |
| From Z2 |
Definitely perfect pieces to add to my garage.
Monday, March 21, 2011
Blast and Seal - Wheel Wells
Inspired by having less than 100 days to finish my car I have recently found some time to work on it.
I have chemically stripped all of the factory undercoating out from the wheel wells on all four corners, and sand blasted out the remaining residue.
Still wielding my new found ambition, I gathered my painting supplies.
Black Zero Rust, according to "Resto Rick", should be thinned by 25% using a lacquer thinner in order to be sprayable.
That's one part thinner to four parts Zero Rust.
Using my nifty dumping spout I fill the cup to the 20oz marker adding 16oz to 4oz of lacquer thinner.
Here is my ridiculously long spray contraption.
lol.
It consists of an air pressure regulator and an inline water filter which keeps my shitty compressor from fucking up my dope ass paint job.
Next time I paint I will re think this setup but only because it was hard to get it under the car in certain places due to it's height.
A couple hours later, It's beer time.
Sealed the cowl area.
Inside the cowl area.
Under the fenders.
And all four wheel wells.
As you can see in the above photo I need to remove and repaint some more pieces from underneath the rear of the car. I will clean and seal all of the inner body panels (especially the rear in the above photo) to make it chemically impossible for it to rust for a good long while. Assuming I'm not retarded. But that may be assuming too much.
Here is a link to Resto Rick's Tips and Tricks for using Zero Rust.
I found them to be invaluable.

 |
| From Z2 |
I have chemically stripped all of the factory undercoating out from the wheel wells on all four corners, and sand blasted out the remaining residue.
 |
| From Z2 |
 |
| From Z2 |
Still wielding my new found ambition, I gathered my painting supplies.
 |
| From Z2 |
Black Zero Rust, according to "Resto Rick", should be thinned by 25% using a lacquer thinner in order to be sprayable.
 |
| From Z2 |
That's one part thinner to four parts Zero Rust.
Using my nifty dumping spout I fill the cup to the 20oz marker adding 16oz to 4oz of lacquer thinner.
Here is my ridiculously long spray contraption.
 |
| From Z2 |
lol.
It consists of an air pressure regulator and an inline water filter which keeps my shitty compressor from fucking up my dope ass paint job.
Next time I paint I will re think this setup but only because it was hard to get it under the car in certain places due to it's height.
A couple hours later, It's beer time.
 |
| From Z2 |
Sealed the cowl area.
 |
| From Z2 |
Inside the cowl area.
 |
| From Z2 |
Under the fenders.
 |
| From Z2 |
And all four wheel wells.
 |
| From Z2 |
 |
| From Z2 |
 |
| From Z2 |
As you can see in the above photo I need to remove and repaint some more pieces from underneath the rear of the car. I will clean and seal all of the inner body panels (especially the rear in the above photo) to make it chemically impossible for it to rust for a good long while. Assuming I'm not retarded. But that may be assuming too much.
Here is a link to Resto Rick's Tips and Tricks for using Zero Rust.
I found them to be invaluable.
Wednesday, March 16, 2011
Struts ordered
Ordered a set of Tokico Illumina adjustable strut inserts.

I ordered a pair of Tokico part number BZ3099 which is intended for the rear struts on 1987-89 Toyota "AW11" MR2. I will run these on the front of my Z to allow for full travel in a strut that is approx 2" shorter that OE. And I ordered a pair of part number BZ3015 which is the stock size strut for the front of my 240z, but I will run them in the rear of the car.
With the Ground Control coilover setup I can place the threaded tube so that maximum adjustability and flexibility can be achieved, and since I'm shortening (sectioning) my strut tubes to the exact difference between these shorter struts and the OE, I don't lose any travel when lowering.

Hopefully I can link up with my "pro-welder" buddy Bruce within the next week or two and I will have some epic clandestine metal shop pics for you guys.
**Edit** Just wanted to give photo props to Circuit Soul for the slammed RWB bumper pic I stole. They are a new site that appears to be launching soon and from what I can tell so far I am going to be a fan.
http://www.Circuitsoul.com
Facebook Page
I ordered a pair of Tokico part number BZ3099 which is intended for the rear struts on 1987-89 Toyota "AW11" MR2. I will run these on the front of my Z to allow for full travel in a strut that is approx 2" shorter that OE. And I ordered a pair of part number BZ3015 which is the stock size strut for the front of my 240z, but I will run them in the rear of the car.
With the Ground Control coilover setup I can place the threaded tube so that maximum adjustability and flexibility can be achieved, and since I'm shortening (sectioning) my strut tubes to the exact difference between these shorter struts and the OE, I don't lose any travel when lowering.
Hopefully I can link up with my "pro-welder" buddy Bruce within the next week or two and I will have some epic clandestine metal shop pics for you guys.
**Edit** Just wanted to give photo props to Circuit Soul for the slammed RWB bumper pic I stole. They are a new site that appears to be launching soon and from what I can tell so far I am going to be a fan.
http://www.Circuitsoul.com
Facebook Page
Subscribe to:
Posts (Atom)


